This is part of the CEP Mega Guide series. See also: sample CEP extension source
And so we reach the longest and most detailed part of the guide - how to actually make Adobe tools do stuff from an HTML panel. Taking a deep breath, and keeping the feet shoulder-width apart, here we go:
Architecture
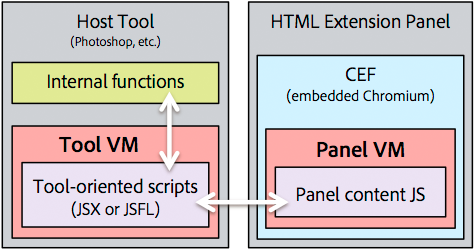
Each of the tools supporting CEP 5 has a built-in Javascript virtual machine for tool automation. However, these VMs are entirely separate from the VM that runs scripts inside an HTML panel. So if you have a Photoshop panel with a button that’s supposed to, say, open a new document, then the button’s event handler runs in one VM while the “new document” API lives in another. As such, tool integration for HTML panels is mainly a matter of bridging the gap between the two VMs.
In this series I’ll refer to the two JS engines as the panel VM and the tool VM. Architecturally, things look like this:

As shown, scripts in the tool VM can directly call internal functionality (like opening a new document). To do such things from the panel VM you pass code to the tool VM.
And speaking of the tool VM, there are two flavors: Flash Pro’s is called JSFL while all the other tools use ExtendScript. The distinction isn’t very important though - they both use standard Javascript and the specific APIs vary from tool to tool, even among the ExtendScript tools. For historic reasons it’s customary to use .jsfl and .jsx extensions for scripts meant for JSFL and ExtendScript, but this isn’t required. (I recommend it though, as it’s easy to mix up which script is meant for which VM.)
Passing script to the Tool VM
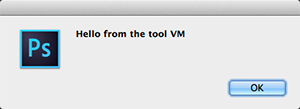
Bridging the gap between the two VMs is done with the CSInterface class. (For the basics on CSInterface see Part 3 of this guide.) It has a handy evalScript method, which takes a string and passes it over to the tool VM to be evaluated as Javascript. For example, to call alert() from the tool VM, you can call code like this in the panel VM:
var js = "alert('Hello from the tool VM')"; |

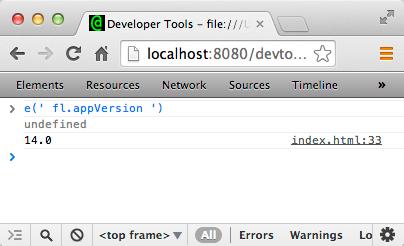
Note the different quotes used to wrap that command into a string literal. You can also get callbacks from the tool VM, if you call evalScript and pass in a function. In my extension work I found it useful to make a helper function that passes a script over to the tool VM, and writes the result to the console, thus:
window.e = function(js) { |
Then I used CEP’s debug console to poke around the tool VM:

Running script files in the Tool VM
As you can probably imagine, writing code inside string literals gets old very fast, so it’s typically better to put scripts meant for the tool VM in separate (.jsx or .jsfl) files, and run them independently.
There are two ways to get the tool VM to execute a script. The easiest is by declaring a ScriptPath tag in the extension’s XML manifest:
<Extension Id="com.fenomas.example.andytest"> |
Any scripts inside the folder declared that way will be run (in the tool VM) when the panel initializes. So the easiest way to work is usually to define all your tool-side functions inside the tool VM at init, and then call them dynamically with evalScript when you need to.
There are also commands to execute script files in the tool VM dynamically. Both JSFL and ExtendScript have an “eval file” command ( fl.runScript and $.evalFile respectively). Here’s the script I used, which first detects whether it’s running in Flash or not and then tells the tool VM to execute a script file:
var cs = new CSInterface(); |
It may look a bit involved, but it’s not too bad if you keep track of what is going on in which VM:
new CSInterface().evalScriptis called in the panel VM, and passes a string of JS over to the tool VM.fl.runScriptand$.evalFileexist in the tool VMs, take a string path, and execute the file they find.
Working with tool APIs
Calling tool APIs from the tool VM is straightforward:
// open a new document in Photoshop |
Calling APIs is the easy part. The hard part is finding what APIs you need and knowing what arguments they take. Of course things are documented, but the details vary a lot by tool, and in some cases there are easier ways of finding APIs than looking at the docs. From here on I’ll summarize what I’ve figured out so far.
Note: nothing about each tool’s internal API is new to CEP 5. Most of these tool VMs go back many years, so in general, code you google up from old tutorials will still work fine when called from an HTML extension.
Regarding Flash and JSFL:
I personally think JSFL is the easiest tool VM to work with. Official JSFL docs are here, but there’s actually a much simpler way to figure out how to do things: by using Flash’s “History” panel. The process is:
- Open up a new file in Flash, and do whatever it is you’d like the API for
- Open the history panel and select the action(s) you did
- Right-click –> Copy Steps
- Paste into your JSFL and edit
Since JSFL basically exposes APIs in one-to-one correspondence with IDE features, you can find just about any API this way. To make it even more convenient, in the panel menu select “View –> Javascript in panel”, and the JSFL for each action will show right in the panel:
Having easy access to the APIs this way makes JSFL quite easy to work with. The part that takes getting used to is that JSFL APIs are largely tied to IDE functionality. So for example to duplicate something, rather than looking for a .clone() method you’d typically call one API to select it, and then a second API that duplicates the current selection. This sounds odd in code, but if you capture code from the history panel it’s easy to see what needs to be done.
ExtendScript APIs and the ExtendScript Toolkit
ExtendScript also has a DOM-like API. Though the high-level design, and a few APIs, are consistent across all tools supporting ExtendScript, most of the details vary widely, so as a general rule you’ll probably need to write separate JSX for each tool you want your extension to support.
Not all of them got updated with the most recent release, but here are the most current docs I could find for each tool:
- Photoshop CC 2014 JS Reference
- Illustrator CC 2014 JS Reference
- After Effects CS6 Scripting
- InDesign CS6 JS Reference
- InCopy CS6 JS Reference
Although there’s no easy way of capturing JSX as with Flash’s history panel, there is a handy debugging environment called the ExtendScript Toolkit, which can be installed (like any other Adobe tool) via the Creative Cloud desktop app. ESTK lets you inspect the tool VM of any ExtendScript tool that’s currently running, and also has a console for dynamically running JSX. Full ESTK docs can be found in the tool (Help -> Javascript tools guide), but the short version is:
- Run a tool (Photoshop, etc.)
- Run the ExtendScript Toolkit app
- In the upper-left corner of ESTK, select the app you’re running from the pulldown menu
- In the upper-right, browse the tool VM’s DOM
- In the left side, write any arbitrary JSX and press the green “Play” button
- Command output will show up in the JS console at the bottom

Photoshop’s “other” API
The DOM-like ExtendScript API I’ve described so far gives you access to many of each tool’s capabilities, but in Photoshop’s case there’s actually an older, much lower-level API lurking underneath. And I mean low-level - here’s some sample code to open a new document:
var idMk = charIDToTypeID( "Mk " ); |
As you can see, it’s not exactly app.documents.add() . Basically this code is assembling an object full of strings and numbers, and then passing it to the magical executeAction method, which knows how to make sense of it all. This API is basically internal, and is not (as far as I can tell) documented. So it’s not really something you can study up on. However, it’s the only way to do certain things in Photoshop, and it is possible to capture sample script (similar to Flash’s history panel), from which you can get a general idea of what’s going on.
To do this, grab the “Scripting listener” plug-in from the Photoshop Scripting page. Install that (by placing the contents inside your Photoshop install’s “Plug-ins” folder). Once that’s done, every time you execute an action in Photoshop, the low-level script required for that action will be written out to a text file on your desktop. By emptying that file, doing something in PS, and then examining the script generated, you can at least get chunks of usable code. Once you start editing it though, it’s not always clear what you’re allowed to change, so a fair amount of trial and error comes into play.
Well! With that novel of a blog post complete, you now know everything I do about scripting Adobe tools.
Except, of course, how to pass events back and forth between the two VMs, or between extensions and other tools. Conveniently, that’s what I’ll cover in the next article in the series.